- For the following IPv4 subnets, indicate the smallest and the largest IPv4 address inside the subnet :
- 8.0.0.0/8
- 172.12.0.0/16
- 200.123.42.128/25
- 12.1.2.0/13
- For the following IPv6 subnets, indicate the smallest and the largest IPv6 address inside the subnet :
- FE80::/64
- 2001:db8::/48
- 2001:6a8:3080::/48
- Researchers and network operators collect and expose lots of BGP data. For this, they establish eBGP sessions between data collection routers and production routers located in operational networks. Several data collection routers are available, the most popular ones are :
For this exercise, you will use one of the routeviews BGP routers. You can access one of these routers by using telnet. Once logged on the router, you can use the router’s command line interface to analyse its BGP routing table.
telnet route-views.routeviews.org Trying 128.223.51.103... Connected to route-views.routeviews.org. Escape character is ’^]’. C *********************************************************************                    Oregon Exchange BGP Route Viewer
         route-views.oregon-ix.net / route-views.routeviews.org
route views data is archived on http://archive.routeviews.org
This hardware is part of a grant from Cisco Systems. Please contact help@routeviews.org if you have questions or comments about this service, its use, or if you might be able to contribute your view.
This router has views of the full routing tables from several ASes. The list of ASes is documented under "Current Participants" on http://www.routeviews.org/.
                            **************
route-views.routeviews.org is now using AAA for logins. Login with username "rviews". See http://routeviews.org/aaa.html
*********************************************************************
User Access Verification Username: rviews route-views.oregon-ix.net>
This router has eBGP sessions with routers from several ISPs. See here for an up-to-date list of all eBGP sessions maintained by this router.
Among all the commands supported by this router, the show ip bgp command is very useful. This command takes an IPv4 prefix as parameter and allows you to retrieve all the routes that this routers has received in its Adj-RIB-In for the specified prefix.
- Use show ip bgp 130.104.0.0/16 to find the best path used by this router to reach UCLouvain
- Knowing that 130.104.0.0/16 is announced by belnet (AS2611), what are, according to this BGP routing tables, the ASes that peer with belnet
- Do the same analysis for one of the IPv4 prefixes assigned to Skynet (AS5432) : 62.4.128.0/17. The output of the show ip bgp 62.4.128.0/17 reveals something strange as it seems that one of the paths towards this prefix passes twice via AS5432. Can you explain this ?
2905 702 1239 5432 5432 196.7.106.245 from 196.7.106.245 (196.7.106.245) Origin IGP, metric 0, localpref 100, valid, external
- netkit allows to easily perform experiments by using an emulated environment is is composed of virtual machines running User Model Linux. netkit allows to setup a small network in a lab and configure it as if you had access to several PCs interconnected by using cables and network equipments.
A netkit lab is defined as a few configuration files and scripts :
lab.conf is a textfile that defines the virtual machines and the network topology. A simple lab.conf file is shown below.
LAB_DESCRIPTION="a string describing the lab" LAB_VERSION=1.0 LAB_AUTHOR="the author of the lab" LAB_EMAIL="email address of the author"
h1[0]="lan" h2[0]="lan"
This configuration file requests the creation of two virtual machines, named h1 and h2. Each of these hosts has one network
A host.startup file for each host (h1.startup and h2.startup in the example above). This file is a shell script that is executed at the end of the boot of the virtual host. This is typically in this script that the network interfaces are configured and the daemons are launched. A directory for each host (h1 and h2 in the example above). This directory is used to store configuration files that must be copied on the virtual machine’s filesystems when they are first created.
netkit contains several scripts that can be used to run a lab. lstart allows to launch a lab and lhalt allows to halt the machines at the end of a lab. If you need to exchange files between the virtual machines and the Linux host on which netkit runs, note that the virtual hosts mount the directory that contains the running lab in /hostlab and your home directory in /hosthome.
For this exercise, you will use a netkit lab containing 4 hosts and two routers. The configuration files are available exercises/labs/lab-2routers.tar.gz. The network topology of this lab is shown in the figure below.
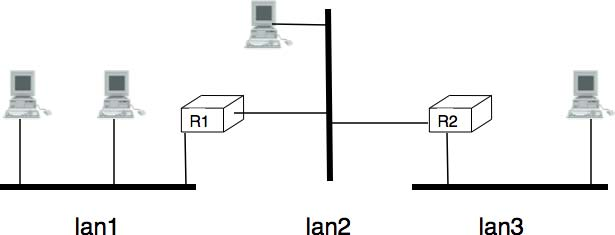
The lab.conf file for this lab is shown below.
h1[0]="lan1" h2[0]="lan1" h3[0]="lan2" router1[0]="lan1" router1[1]="lan2"router2[0]="lan2"router2[1]="lan3" h4[0]="lan3"
In this network, we will use subnet 172.12.1.0/24 for lan1, 172.12.2.0/24 for lan2 and 172.12.3.0/24 for lan3.
On Linux, the IP addresses assigned on an interface can be configured by using ifconfig(8). When ifconfig(8) is used without parameters, it lists all the existing interfaces of the host with their configuration. A sample ifconfig(8) output is shown below.
host:~# ifconfig eth0  Link encap:Ethernet HWaddr FE:3A:59:CD:59:AD       Inet addr:192.168.1.1 Bcast:192.168.1.255 Mask:255.255.255.0       inet6 addr: fe80::fc3a:59ff:fecd:59ad/64 Scope:Link       UP BROADCAST RUNNING MULTICAST MTU:1500 Metric:1       RX packets:3 errors:0 dropped:0 overruns:0 frame:0       TX packets:3 errors:0 dropped:0 overruns:0 carrier:0       collisions:0 txqueuelen:1000       RX bytes:216 (216.0 b) TX bytes:258 (258.0 b)       Interrupt:5
lo    Link encap:Local Loopback       inet addr:127.0.0.1 Mask:255.0.0.0       inet6 addr: ::1/128 Scope:Host       UP LOOPBACK RUNNING MTU:16436 Metric:1       RX packets:0 errors:0 dropped:0 overruns:0 frame:0       TX packets:0 errors:0 dropped:0 overruns:0 carrier:0       collisions:0 txqueuelen:0      RX bytes:0 (0.0 b) TX bytes:0 (0.0 b)
This host has two interfaces : the loopback interface (lo with IPv4 address 127.0.0.1 and IPv6 address ::1) and the eth0 interface. The 192.168.1.1/24 address and a link local IPv6 address (fe80::fc3a:59ff:fecd:59ad/64) have been assigned to interface eth0. The broadcast address is used in some particular cases, this is outside the scope of this exercise. ifconfig(8) also provides statistics such as the number of packets sent and received over this interface. Another important information that is provided by ifconfig(8) is the hardware address (HWaddr) used by the datalink layer of the interface. On the example above, the eth0 interface uses the 48 bits FE:3A:59:CD:59:AD hardware address.
You can configure the IPv4 address assigned to an interface by specifying the address and the netmask.
ifconfig eth0 192.168.1.2 netmask 255.255.255.128 up
You can also specify the prefix length
.. code-block:: text
ifconfig eth0 192.168.1.2/25 up
In both cases, ifconfig eth0 allows you to verify that the interface has been correctly configured.
eth0 Link encap:Ethernet HWaddr FE:3A:59:CD:59:AD inet addr:192.168.1.2 Bcast:192.168.1.127 Mask:255.255.255.128 inet6 addr: fe80::fc3a:59ff:fecd:59ad/64 Scope:Link UP BROADCAST RUNNING MULTICAST MTU:1500 Metric:1 RX packets:3 errors:0 dropped:0 overruns:0 frame:0 TX packets:3 errors:0 dropped:0 overruns:0 carrier:0 collisions:0 txqueuelen:1000 RX bytes:216 (216.0 b) TX bytes:258 (258.0 b) Interrupt:5
Another important command on Linux is route(8) that allows to look at the contents of the routing table stored in the Linux kernel and change it. For example, route -n returns the contents of the IPv4 routing table. See route(8) for a detailed description on how you can configure routes by using this tool.
- Use ifconfig(8) to configure the following IPv4 addresses :
- 172.16.1.11/24 on interface eth0 on h1
- 172.16.1.12/24 on interface eth0 on h2
- Use route -n to look at the contents of the routing table on the two hosts.
- Verify by using ping(8) that h1 can reach address 172.16.2.1.
- Use ifconfig(8) to configure IPv4 address 172.16.1.1/24 on the eth0 interface of router1 and 172.16.2.1/24 on the eth1 interface on this router. Verify by using ping(8) that h1 can reach 172.16.1.12
- Since hosts h1 and h2 are attached to a local area network that contains a single router, this router can act as a default router. Add a default route on h1 and h2 so that they can use router1 as their default router to reach any remote IPv4 address.
- What do you need to configure on router2, h3 and h4 so that all hosts and routers can reach all hosts and routers in the emulated network ? Add the ifconfig and route commands in the .startup files of all the hosts so that the network is correctly configured when it is started by using lstart.
- Use the network configured above to test how IP packets are fragmented. The ifconfig command allows you to specify the Maximum Transmission Unit (MTU), i.e. the largest size of the frames
that are allowed on a given interface. The default MTU on the eth? interfaces is 1500 bytes.
- Force an MTU of 500 bytes on the three interfaces attached to lan2.
- Use ping -s 1000 to send a 1000 bytes ping packet from h3 to one of the routers attached to lan2 and capture the packets on the other router by using tcpdump(8). In which order does the emulated host sends the IP fragments ?
- Use ping -s 2000 to send a 2000 bytes ping packet from h1 to h4 and capture the packets on lan2 and lan3 by using tcpdump(8). In which order does the emulated host sends the IP fragments ?
- From your measurements, how does an emulated host generate the identifiers of the IP packets that it sends ?
- Reset the MTU on the eth1 interface of router r1 at 1500 bytes, but leave the MTU on the eth0 interface of router r2 at 500 bytes. Check whether host h1 can ping host h4. Use tcpdump(8) to analyse what is happening.
- The Routing Information Protocol (RIP) is a distance vector protocol that is often used in small IP networks. There are various implementations of RIP. For this exercise, you will use quagga, an open-source implementation of several IP routing protocols that runs on Linux and other Unix compatible operating systems. quagga(8) is in fact a set of daemons that interact together and with the Linux kernel. For this exercise, you will use two of these daemons : zebra(8) and ripd(8). zebra(8) is the master daemon that handles the interactions between the Linux kernel routing table and the routing protocols. ripd(8) is the implementation of the RIP protocol. It interacts with the Linux routing tables through the zebra(8) daemon.
To use a Linux real or virtual machine as a router, you need to first configure the IP addresses of the interfaces of the machine. Once this configuration has been verified, you can configure the zebra(8) and ripd(8) daemons. The configuration files for these daemons reside in /etc/zebra. The first configuration file is /etc/zebra/daemons. It lists the daemons that are launched when zebra is started by /etc/init.d/zebra. To enable ripd(8) and zebra(8), this file will be configured as follows.
# This file tells the zebra package # which daemons to start. # Entries are in the format: <daemon>=(yes|no|priority) # where ’yes’ is equivalent to infinitely low priority, and # lower numbers mean higher priority. Read # /usr/doc/zebra/README.Debian for details. # Daemons are: bgpd zebra ospfd ospf6d ripd ripngd zebra=yes bgpd=no ospfd=yes ospf6d=no ripd=no ripngd=no
The second configuration file is the /etc/zebra/zebra.conf file. It defines the global configuration rules that apply to zebra(8). For this exercise, we use the default configuration file shown below.
! -*-zebra -*! ! zebra configuration file! hostname zebra password zebra enable password zebra ! ! Static default route sample. ! !ip route 0.0.0.0/0 203.181.89.241 !log file /var/log/zebra/zebra.log
In the zebra configuration file, lines beginning with ! are comments. This configuration defines the hostname as zebra and two passwords. The default password (password zebra) is the one that must be given when connecting to the zebra(8) management console over a TCP connection. This management console can be use like a shell on a Unix host to specify commands to the zebra(8) daemons. The second one (enable password zebra) specifies the password to be provided before giving commands that change the configuration of the daemon. It is also possible to specify static routes in this configuration file, but we do not use this facility in this exercise. The last parameter that is specified is the log file where zebra(8) writes debugging information. Additional information about quagga are available from here.
The most interesting configuration file for this exercise is the /etc/zebra/ripd.conf file. It contains all the parameters that are specific to the operation of the RIP protocol. A sample ripd(8) configuration file is shown below.
! hostname ripd password zebra enable password zebra ! router rip network 100.1.0.0/16 redistribute connected ! log file /var/log/zebra/ripd.log
This configuration files shown the two different ways to configure ripd(8). The statement router rip indicates the beginning of the configuration for the RIP routing protocol. The indented lines that follow are part of the configuration of this protocol. The first line, network 100.1.0.0/16 is used to enable RIP on the interface whose IP subnet matches 100.1.0.0/16. The second line, redistribute connected indicates that all the subnetworks that are directly connected on the router should be advertised. When this configuration line is used, ripd(8) interacts with the Linux kernel routing table and advertises all the subnetworks that are directly connected on the router. If a new interface is enabled and configured on the router, its subnetwork prefix will be automatically advertised. Similarly, the subnetwork prefix will be automatically removed if the subnetwork interface is shutdown.
To experiment with RIP, you will use the emulated routers shown in the figure below. You can download the entire lab from here.
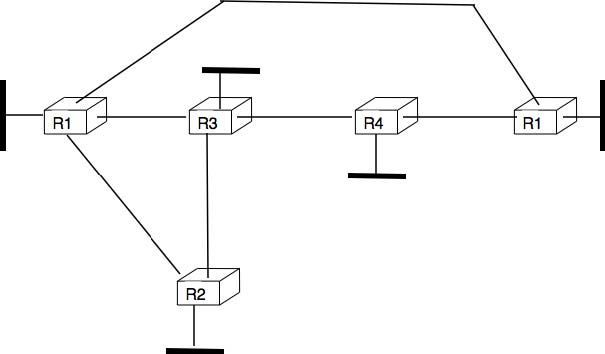
The lab.conf describing the topology and the interfaces used on all hosts is shown below/
r1[0]="A" r1[1]="B" r1[2]="F" r1[3]="V" r2[0]="A" r2[1]="C" r2[2]="W"r3[0]="B"r3[1]="C" r3[2]="D" r3[3]="X" r4[0]="D" r4[1]="E" r4[2]="Y" r5[0]="E" r5[1]="F" r5[2]="Z"
There are two types of subnetworks in this topology. The subnetworks from the 172.16.0.0/16 prefix are used on the links between routers while the subnetworks from the 192.168.0.0/16 prefix are used on the local area networks that are attached to a single router.
A router can be configured in two different ways : by specifying configuration files and by typing the commands directly on the router by using telnet(1). The first four routers have been configured in the provided configuration files. Look at r1.startup and the configurations files in r1/tmp/zebra in the lab’s directory for router r1. The r?.startup files contain the ifconfig(8) commands that are used to configure the interfaces of each virtual router. The configuration files located in r?/tmp/zebra are also copied automatically on the virtual router when it boots.
- Launch the lab by using lstart and verify that router r1 can reach 192.168.1.1, 192.168.2.2, 192.168.3.3 and 192.168.4.4. You can also traceroute(8) to determine what is the route followed by your packets.
- The ripd(8) daemon can also be configured by typing commands over a TCP connection. ripd(8) listens on port 2602. On router r1, use telnet 127.0.0.1 2602 to connect to the ripd(8) daemon. The default password is zebra. Once logged on the ripd(8) daemon, you reach the > prompt where you can query the status of the router. By typing ? at the prompt, you will find the list of supported commands. The show command is particularly useful, type show ? to obtain the list of its sub options. For example, show ip rip will return the routing table that is maintained by the ripd(8) daemon.
- Disable interface eth3 on router r1 by typing ifconfig eth3 down on this router. Verify the impact of this command on the routing tables of the other routers in the network. Re-enable this interface by typing ifconfig eth3 up.
- Do the same with the eth1 interface on router r3.
- Edit the /etc/zebra/ripd.conf configuration file on router r5 so that this router becomes part of the network. Verify that 192.168.5.5 is reachable by all routers inside the network.
- The Open Shortest Path First (OSPF) protocol is a link-state protocol that is often used in enterprise IP networks. OSPF is implemented in the ospfd(8) daemon that is part of quagga. We use the same topology as in the previous exercise. The netkit lab may be downloaded from exercises/labs/lab-5routers-ospf.tar.gz.
- The ospfd(8) daemon supports a more complex configuration that the ripd(8) daemon. A sample configuration is shown below.
! hostname ospfd password zebra enable password zebra ! interface eth0 ip ospf cost 1 interface eth1 ip ospf cost 1 interface eth2 ip ospf cost 1 interface eth3 ip ospf cost 1 ! router ospf router-id 192.168.1.1 network 172.16.1.0/24 area 0.0.0.0 network 172.16.2.0/24 area 0.0.0.0 network 172.16.3.0/24 area 0.0.0.0 network 192.168.1.0/24 area 0.0.0.0 passive-interface eth3 !log file /var/log/zebra/ospfd.log
In this configuration file, the ip ospf cost 1 specify a metric of 1 for each interface. The ospfd(8) configuration is composed of three parts. First, each router must have one identifier that is unique inside the network. Usually, this identifier is one of the IP addresses assigned to the router. Second, each subnetwork on the router is associated with an area. In this example, we only use the backbone area (i.e. 0.0.0.0). The last command specifies that the OSPF Hello messages should not be sent over interface eth3 although its subnetwork will be advertised by the router. Such a command is often used on interfaces that are attached to endhosts to ensure that no problem will occur if a student configures a software OSPF router on his laptop attached to this interface.
The netkit contains already the configuration for routers r1 -r4.
The ospfd(8) daemon listens on TCP port 2604. You can follow the evolution of the OSPF protocol by using the show ip ospf ? commands.
- Launch the lab by using lstart and verify that the 192.168.1.1, 192.168.2.2, 192.168.3.3 and 192.168.4.4 addresses are reachable from any router inside the network.
- Configure router r5 by changing the /etc/zebra/ospfd.conf file and restart the daemon. Verify that the 192.168.5.5 address is reachable from any router inside the network.
- How can you update the network configuration so that the packets sent by router r1 to router r5 use the direct link between the two routers while the packets sent by r5 are forwarded via r4 ?
- Disable interface eth3 on router r1 and see how quickly the network converges ? You can follow the evolution of the routing table on a router by typing netstat -rnc. Re-enable interface eth3 on router r1.
- Change the MTU of eth0 on router r1 but leave it unchanged on interface eth0 of router r2. What is the impact of this change ? Can you explain why ?
- Disable interface eth1 on router r3 and see how quickly the network converges ? Re-enable this interface.
- Halt router r2 by using vcrash r2. How quickly does the network react to this failure ?
- 4302 reads